top of page
TestNG Tutorial
TestNG Test
How To Write First Test In TestNG ?
I hope you have installed the testNG plugin in your IDE as explained in previous articles. So let's start writing a test in testNG. Add TestNG Library in the Project Now create a java project in your IDE and add essential jars in the project as per requirement. After this, right-click on the project and go to the 'Build Path' then select 'Configue Build Path...' .
![](https://static.wixstatic.com/media/3bc9da_552e626f8a1d4ed3aea06e27d77a75e8~mv2.png/v1/fill/w_56,h_70,al_c,q_85,usm_0.66_1.00_0.01,blur_2,enc_auto/3bc9da_552e626f8a1d4ed3aea06e27d77a75e8~mv2.png)
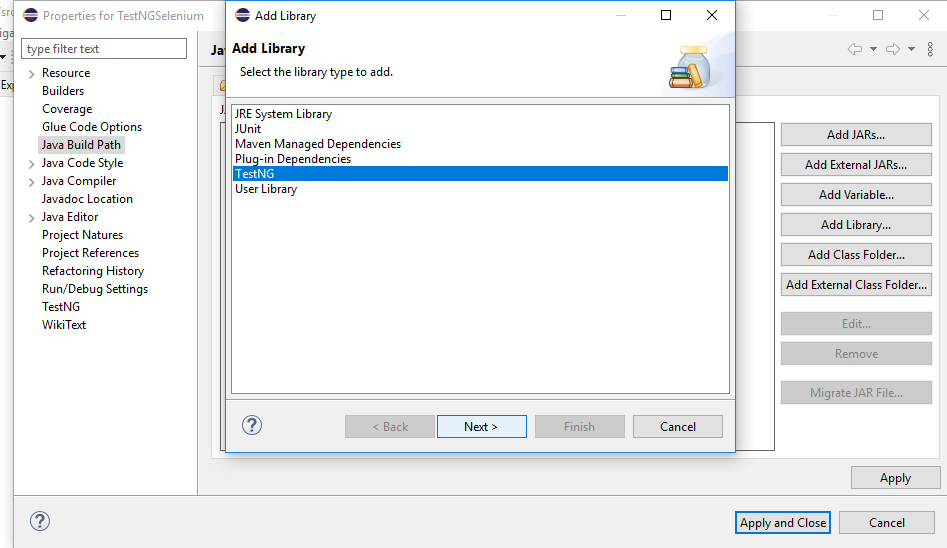
Under the 'Libraries' section select 'classpath' and then click on 'Add library...' .
![](https://static.wixstatic.com/media/3bc9da_e14ccf3dbb0e4a1aa9b4597d09e4ff05~mv2.png/v1/fill/w_47,h_27,al_c,q_85,usm_0.66_1.00_0.01,blur_2,enc_auto/3bc9da_e14ccf3dbb0e4a1aa9b4597d09e4ff05~mv2.png)
Now here select 'TestNG' then proceed with 'Next' and 'Finish' and then 'Apply and Close' .
![](https://static.wixstatic.com/media/3bc9da_a4c4b5f2fdca407d955f53aaa8e9fb77~mv2.png/v1/fill/w_47,h_27,al_c,q_85,usm_0.66_1.00_0.01,blur_2,enc_auto/3bc9da_a4c4b5f2fdca407d955f53aaa8e9fb77~mv2.png)
![](https://static.wixstatic.com/media/3bc9da_238053219bd44367a29460adabd82c6b~mv2.png/v1/fill/w_47,h_27,al_c,q_85,usm_0.66_1.00_0.01,blur_2,enc_auto/3bc9da_238053219bd44367a29460adabd82c6b~mv2.png)
If it would be done successfully, you will see a 'TestNG' library within your project.
![](https://static.wixstatic.com/media/3bc9da_f026ce02f88545ed8227614a5b97e5ec~mv2.png/v1/fill/w_120,h_133,al_c,q_85,usm_0.66_1.00_0.01,blur_2,enc_auto/3bc9da_f026ce02f88545ed8227614a5b97e5ec~mv2.png)
Create a TestNG Class For creating a class, a good approach is to create a package first. So, I will create a package as 'testNGexamples'. Now I will create some classes within it. Follow these steps to create a testNG class : Right-click on the testNGexamples package, select 'create TestNG class' under 'TestNG' option.
![](https://static.wixstatic.com/media/3bc9da_659bd24382bc497abbd33b8778ab45c2~mv2.png/v1/fill/w_61,h_59,al_c,q_85,usm_0.66_1.00_0.01,blur_2,enc_auto/3bc9da_659bd24382bc497abbd33b8778ab45c2~mv2.png)
A pop-up window will be opened, write class name there and select annotaions(optional) then 'Finish' .
![](https://static.wixstatic.com/media/3bc9da_52fee1b03ac04efcba95e290d26e5598~mv2.png/v1/fill/w_87,h_53,al_c,q_85,usm_0.66_1.00_0.01,blur_2,enc_auto/3bc9da_52fee1b03ac04efcba95e290d26e5598~mv2.png)
TestNG class has been created now. Write your test here.
![](https://static.wixstatic.com/media/3bc9da_550d016b228e4354b8f092e738cb2fef~mv2.png/v1/fill/w_49,h_18,al_c,q_85,usm_0.66_1.00_0.01,blur_2,enc_auto/3bc9da_550d016b228e4354b8f092e738cb2fef~mv2.png)
An Example of Test In TestNG =>
package testNGexamples;
import org.testng.annotations.Test;
import org.testng.annotations.BeforeClass;
import org.testng.annotations.AfterClass;
public class SimpleTest {
@Test
//This is the Test
public void firstTest() {
System.out.println("Test Is Executing ...");
}
@BeforeClass
//This will execute before class
public void beforeClass() {
System.out.println("Test starts :");
}
@AfterClass
//This will execute after class
public void afterClass() {
System.out.println("Test ends :");
}
}
Output :
![](https://static.wixstatic.com/media/3bc9da_6c683163ccd64fa6a7f0ba38a2508bbf~mv2.png/v1/fill/w_49,h_17,al_c,q_85,usm_0.66_1.00_0.01,blur_2,enc_auto/3bc9da_6c683163ccd64fa6a7f0ba38a2508bbf~mv2.png)
Refer next page TestNG Test Suite
bottom of page